Introduction
Sooner or later, backend work runs into batch jobs, and there are more tools to choose from than you’d expect.
Picking the right tool for the job matters, but at work you also have to weigh money and time. I ended up building my batch on Airflow. This post covers why, and how I installed Airflow on macOS and got it running.
| Tool | Use case | Features |
|---|
| Spring Batch | Enterprise-grade batch processing | Transaction management, retry and error handling, chunk-based processing, integration with many data sources, scheduling |
| Apache Spark | Large-scale data processing (batch and streaming) | In-memory processing, fault tolerance, Hadoop ecosystem integration, MLlib, streaming, graph processing |
| AWS Step Functions + AWS Batch | Cloud-based batch processing and orchestration | Serverless execution, scalability, monitoring, integration with other AWS services |
The reason I went with Airflow is simple: the company already had Airflow set up, and spinning up a new server for a single batch job would have been a waste of money.
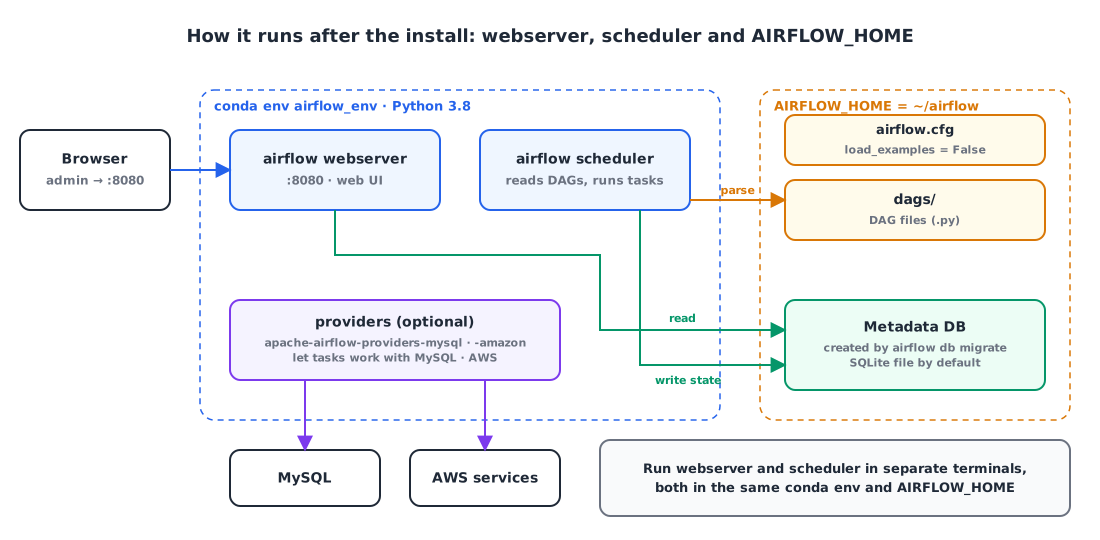
2. What it looks like once installed 🗺️
Here’s what gets installed:
| Component | Role |
|---|
| webserver | Serves the web UI on port 8080. You can see DAG and task status and trigger runs by hand |
| scheduler | Reads DAG files in the dags/ folder and runs tasks on schedule |
| Metadata DB | Stores DAG run history, task state and user info. Unless you configure otherwise, it’s a SQLite file under AIRFLOW_HOME |
AIRFLOW_HOME | The directory that holds airflow.cfg, dags/ and logs |
| provider | Packages of operators and hooks for external systems such as MySQL and AWS |
3. Python and the MySQL client 🐍
① Install Python
1
| brew install python@3.8
|
1
| echo 'export PATH="/opt/homebrew/opt/python@3.8/bin:$PATH"' >> ~/.zshrc
|
The Conda environment we create later carries its own Python 3.8, so the Python Airflow actually runs on is the one inside Conda.
② Install MySQL
1
| brew install mysql-client
|
mysql-client provides the client library needed to build mysqlclient, the package the MySQL provider (installed later) depends on. The MySQL installed here is not Airflow’s metadata DB; it’s the database the tasks will work with.
4. Create a Conda environment 📦
Airflow has a lot of dependencies, so installing it straight into the system Python makes it easy for versions to clash with other projects. I gave it a dedicated environment instead.
① Install Anaconda
Install it from the Anaconda site, then initialize your shell so the conda command is available.
② Create and activate airflow_env
1
| conda create -n airflow_env python=3.8
|
1
| conda activate airflow_env
|
Every command from here on runs in a terminal with airflow_env activated.
5. Install Airflow ✈️
I followed the Airflow Quick Start guide.
① Set AIRFLOW_HOME
This is where Airflow keeps its config file, DAGs, logs and the SQLite DB.
1
| export AIRFLOW_HOME=~/airflow
|
② Build the constraint URL
Because Airflow pulls in so many packages, a plain pip install grabs whatever the latest versions happen to be and breaks easily. To avoid that, Airflow publishes a list of tested package versions (a constraint file) for each combination of Airflow and Python versions.
1
| PYTHON_VERSION="$(python -c 'import sys; print(f"{sys.version_info.major}.{sys.version_info.minor}")')"
|
1
| CONSTRAINT_URL="https://raw.githubusercontent.com/apache/airflow/constraints-${AIRFLOW_VERSION}/constraints-${PYTHON_VERSION}.txt"
|
PYTHON_VERSION is read from the Python of the currently active environment, so this has to run inside airflow_env.
③ Install Airflow
1
| pip install "apache-airflow==${AIRFLOW_VERSION}" --constraint "${CONSTRAINT_URL}"
|
airflow db migrate creates the tables in the metadata DB, and it also generates airflow.cfg in AIRFLOW_HOME. You need an account to log in to the web UI, so create a user with the Admin role. The command prompts you for the password.
1
2
3
4
5
6
| airflow users create \
--username admin \
--firstname Admin \
--lastname User \
--role Admin \
--email admin@example.com
|
① Webserver packages
At the time, I thought the Airflow webserver needed Flask-Admin and Werkzeug, so I installed them too.
1
| pip install apache-airflow flask-admin werkzeug
|
The Airflow 2.x webserver is built on Flask-AppBuilder, so Flask-Admin isn’t needed. The webserver’s dependencies already come in with the constraint install in step 5, and reinstalling apache-airflow without the constraint can actually knock package versions out of line. You can skip this step.
② (Optional) MySQL provider
If your tasks need to store data in or run queries against MySQL, install the MySQL provider.
1
| pip install apache-airflow-providers-mysql
|
If the mysqlclient build fails during the install, the build couldn’t find the MySQL client library. Install pkg-config, export the compile and link flags, and try again.
1
| brew install pkg-config
|
1
| export MYSQLCLIENT_LDFLAGS=$(pkg-config --libs mysqlclient)
|
1
| export MYSQLCLIENT_CFLAGS=$(pkg-config --cflags mysqlclient)
|
③ (Optional) AWS provider
If your tasks need AWS services such as S3, install the Amazon provider.
1
| pip install apache-airflow-providers-amazon
|
7. Turn off the example DAGs and start it up 🚀
① Turn off the example DAGs
By default, Airflow loads its bundled example DAGs, which clutters the list. Turn off load_examples in the [core] section of $AIRFLOW_HOME/airflow.cfg.
1
2
| [core]
load_examples = False
|
② Start the webserver and the scheduler
The webserver and scheduler are separate processes, so open two terminals and start one in each. Both need airflow_env activated and must point at the same AIRFLOW_HOME.
1
| airflow webserver --port 8080
|
You can now log in at localhost:8080 with the admin account you created.
Wrap-up
- Weigh cost as well as features when picking a batch tool. If Airflow is already running, building on it beats standing up a new server.
- Install Airflow with a constraint file. It pins package versions to your Airflow and Python versions so dependencies don’t get tangled.
- Install into a dedicated Conda environment, and activate it both when building the constraint URL and when starting the webserver and scheduler.
- The metadata DB is SQLite unless you configure it. The MySQL provider is for tasks that work with MySQL.
- Start the webserver and scheduler separately. Without the scheduler, DAGs are neither parsed nor run.
References